Creating Pester Unit Tests in PowerShell


Recently as part of my work for the OpenChain project, I have been working on endjin's CodeOps processes. This includes scripts that manage endjin's repositories, meaning that making sure they work properly is really important.
Prior to working on this project, I didn't have any experience with unit tests. It wasn't until using them, not only as a verification process, but also as a collaborative design tool, that I realised how vital they are to the development process.
What is unit testing?
Automatic testing is where tests are performed by a computer that runs a script of written tests, manual testing is where you click through your application and try out different situations to visually see if anything breaks.
There are lots of different methods to testing code, and not just one should be used. It is most effective to use a big variety of tests that could target every aspect of the software you are testing. Here are some of the most common methods of testing:
- Unit Testing: Test small sections that are isolated logically within code, this could be a function or method
- Integration Testing: Where multiple modules of a program are grouped together and tested together as as whole
- End-to-End Testing: A method of testing where the system is tested as a whole under real-like circumstances and data to see how it will perform as a whole
- Smoke Testing: Verifies the most important part of the software is working by running test cases on the build
- Load Testing: Tests software at maximum operating capacity to see if it can cope with a large number or transactions
- Exploratory Testing: Where you come up with use cases that may not come up in the test cases to discover more unusual test cases
This blog will cover how to write unit tests in PowerShell.
Why is unit testing important?
Test-driven development is a programming style which involves focusing on creating tests before developing code. Writing the unit tests first allows you to use them as a guide for writing logic, you start with a failing test which demonstrates how the program should act, and write the code off that. This follows:
Red -> Green -> Refactor
This breaks it down into smaller easier bits, and encourages innovation to reduce the quantity of code being written that otherwise might have not been needed.
Unit testing ensures that each individual part of your code works. They are useful if you are refactoring or making changes to your code, as if all the tests pass before and then they start failing, you know that something has broken, and where it has broken.
They also make it much easier to debug if something isn't behaving the way you think it should. By setting out how you think something should work, it can make it easier to see how the code is actually running.
When should I write my unit tests?
Unit tests should be written alongside the development of your code. They should show how you expect your code to behave, and that covers lots of the different scenarios and cases you may come across.
Unit testing in PowerShell
To unit test in PowerShell you can use Pester, which is the testing and mock framework for PowerShell.
Pester recognises tests by using *.Tests.ps1 as part of the name of your testing file.
There are several different keywords you can use in Pester:
- Describe - The initial container for your tests, it describes what tests are kept inside
- Context - Adds a second layer of categorising your tests, can describe different contexts or scenarios
- It - Defines the individual test
- Should - Performs the assertion on the script within the It statement
- Mock - Allows you to replace commands your test is calling with one of your own
How to Install
If you have PowerShell, v3 of Pester is now packaged in with it, but you will still want to upgrade that version.
v5 of Pester is the newest however you may still be using v4 as v5 doesn't support Gherkin-Style writing of tests. v5 of Pester introduces significant structural changes to tests.
The latest version of Pester is v5 which you can install using the command below as administrator:
Install-Module -Name Pester -Force -SkipPublisherCheck
Once you have it installed you can start making Pester unit tests.
Making your unit tests
Before all your tests you want to setup your script using BeforeAll which will ensure your tests can access the code you are testing:
BeforeAll {
    . $PSCommandPath.Replace('.Tests.ps1', '.ps1')
}
If you are using the $here/$sut method from earlier versions, it won't work now in v5, you'll have to update your code to using BeforeAll.
Here I have my basic function isEven in main.ps1 which takes a number and checks whether it is even or not.
function isEven {
    param($number)
    if (($number % 2) -eq 0) {
        return $true
    } else {
        return $false
    }
}
If an even number is passed in: Write-Output isEven(6) it'll return true and if an odd number is passed in: Write-Output isEven(5) it'll be false.
Now we want to write some tests for it. I create my separate testing file called main.Tests.ps1
First of all we want to describe the tests that we are creating:
Describe "isEven tests" {

}
Then we want to create a Context. A context shows each different scenario, in this example our contexts could be testing for when an even number is inputted, or when an odd number is inputted:
Describe "isEven tests"
    Context "When an even number is inputted" {
        ...
    }
    Context "When an odd number is inputted" {
        ...
    }
Then we want to fill out our tests with our expectations. For the first context of inputting an even number, we want it to return True.
We can use It to describe what we expect to happen with the test and Should as the assertion for what the answer should be. Also note -Be which is shows what the answer should be.
Describe "isEven tests"
    Context "When an even number is inputted" {
       It "Should return true"{
            isEven 2 | Should -Be $true
        }
    }
    Context "When an odd number is inputted" {
        It "Should return false"{
            isEven 7 | Should -Be $false
        }
    }
You can see in the new test we call the isEven function and pass in the value of '2', meaning that we expect it to return true. So then we add a pipe and assert that it should be true.
When we run the tests we get a result like this:
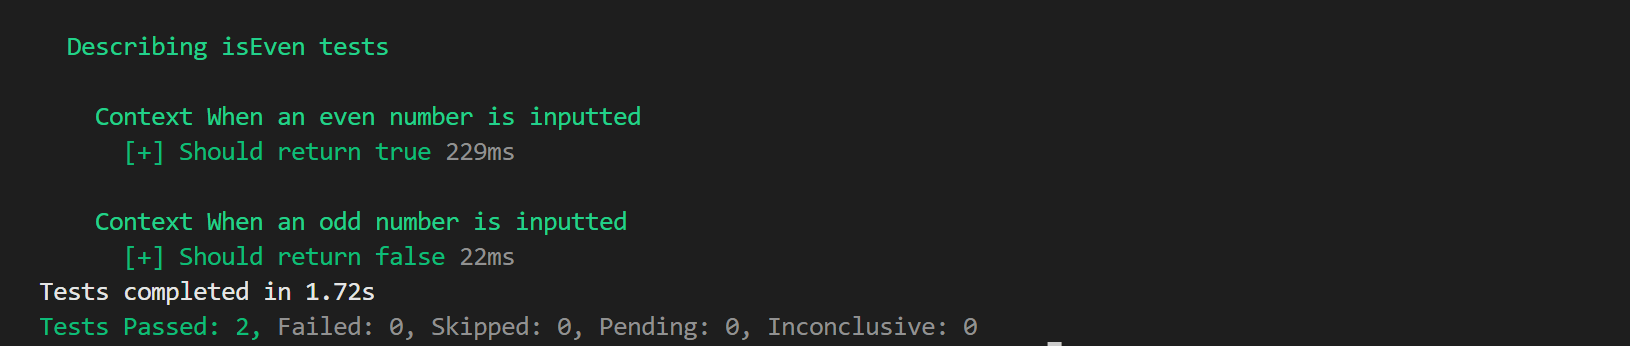
The green shows that the test has passed successfully and so meets the conditions of the test. Now we can break our code and see if the tests show it as broken, now instead of it being % 2 we're changing it to % 4:
function isEven {
    param([int]$number)
    if (($number % 4) -eq 0) {
        return $true
    } else {
        return $false
    }
}
The result of the tests:

The tests failed because the output of the function didn't satisfy the conditions that the test set out.
Demonstrated in the examples above, we can see how useful tests are. If we were to have changed the function to refactor, or implement something else and the tests fail, then we know what has broken, where the error is and that it isn't running like we intended it to.